Chapter 3-15: Using the Image Editor |
Image Editor Options APPX provides a number of tools in the Image Editor for use in designing a new image or redesigning an existing image. As mentioned earlier, most of the icons on the Image Editor toolbar apply to GUI features and require the use of a mouse. However, the standard features of the Image Editor can be employed from the keyboard using the cursor movement keys and various function and option keys. These options are listed on the Image Editor Options help screen, shown in below, and are summarized below. The help screen is available online by pressing F1 (help) from the Image Editor. If option numbers are not displayed and you wish to see them, select Show Option Numbers from the Options pulldown menu.
The Image Editor Options help screen is for informational purposes only; buttons, icons, and options are not operable on this screen. To perform these operations, you must first return to the Image Editor screen by pressing Enter, selecting the Close option, or selecting End
Image Editor Options Help Screen The standard feature options within the Image Editor include the following: Insert Character (Option 1) inserts a space immediately before the current position of your cursor. Delete Character (Option 2) deletes the character (or space) you cursor is currently positioned on. Row/Column Position (Option 3) displays an overlay that contains the current row/column position of your cursor. To clear the display, select Enter. Control Cursor Position (option 4) accesses the Control Cursor Position overlay that controls cursor positioning when a menu or input image displays to a user. See the Control Cursor Position Option section for details. Center Line (Option 5) centers or re-centers an existing line of characters, based on the number of columns in an image. You must use this option if you edit a centered line and change its position or length. Delete Line (Option 6) deletes the entire line your cursor is currently positioned on. Insert Line (Option 7) inserts a new line immediately above the line your cursor is currently positioned on. Move Line(s) (Option 8) moves one or more lines, starting with the line your cursor is currently positioned on. After selecting this option, you are prompted to identify the ending line you want to move, and the new position for the line or lines you want to move.
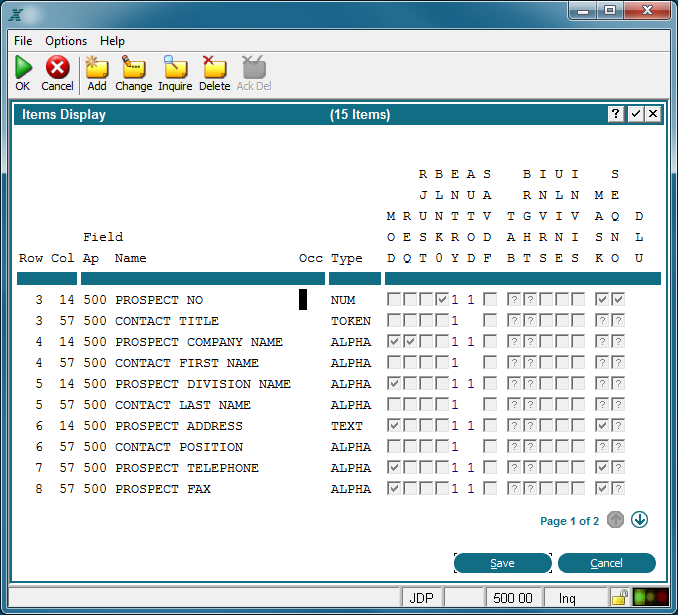
Move Item (Option 9) moves an item from its current position on an image and places it in a position that is established by the placement of your cursor. Position the cursor on the item before selecting this option. After you select the option, pseudo-blanks for the item disappear. Move the cursor to indicate the new starting position for the item, and select Enter Restore All (Option 11) reverts to the last saved image. Toggle View Box (Option 12) repositions an overlay such as the prompt for moving lines on a different part of the image. Edit/ Define Characteristics (Option 13) edits or defines image characteristics. Such characteristics include bright and inverse video for menu and input images, bold and expanded print for output and inquiry images, plus underlining and foreground/background colors for any images. See Defining Image Characteristics for additional procedural information. Edit/Define Lines/Boxes (Option 14) edits or defines lines and boxes. Once you have established the boundaries of the line or box (using the same procedure described in Defining Image Characteristics for (Option 13), a Box Properties overlay appears. See Painting Boxes or Lines for specification details on the Box Properties overlay. Display/Hide Translation Exceptions (Option 17) toggles between highlighting and removing the highlighting from any words, phrases or sentences that have translation exceptions defined for them. This feature is relevant only if the Language Translator feature is in use at your installation. Refer to the Language Translation Manual for more information. Edit/Define Translation Exceptions (Option 95) allows you to select words, phrases or sentences on the image and define translations exceptions for them for APPX to use when performing language translations. This feature is only used if the Language Translator feature is in use at your installation. Refer to the separate APPX Language Translator Manual for more information. F9 - Add Item defines an item representing a single appearance of a logic, numeric, alphanumeric, or data/time field. Position the cursor where the new item will start and press F9. Refer to Defining Items for Input, Output, and Inquiry Images for additional procedural information. F10 - Delete Item removes an item from an existing image. Position your cursor on the item to be deleted and press F10. F11 - Display Items calls the Items Display overlay, shown below, which lists the items defined on the current image along with many of their attributes. Certain attributes can be changed directly from this overlay. Item attributes are discussed in the Image Item Specifications or in the various Additional Attributes sections. You can press F11 at any time to access the Items Display.
Image Editor Items Display F12 - Change Item edits an existing item. Position the cursor on the item to be edited and press F12. Save (No Exit) (Option 16) saves everything you added or changed on a painted image. APPX does not exit the image editor after saving an image.
Save and Exit automatically saves all additions or changes to an image and leaves the image editor environment. Select the Save and Exit
Exit (No Save) exits the image editor and returns you to the previous screen without saving the additions or changes you made to an image. Select the Cancel Image Editor Toolbox (Option 0) calls the Image Editor Toolbox overlay from which you can access the data dictionary, the event points for the current process, or the optional processes for the current image. See the Image Editor Toolbox Option section for details. |
Application Design Manual "Powered by Appx Software"1126 ©2006 By APPX Software, Inc. All Rights Reserved |
 from the titlebar.
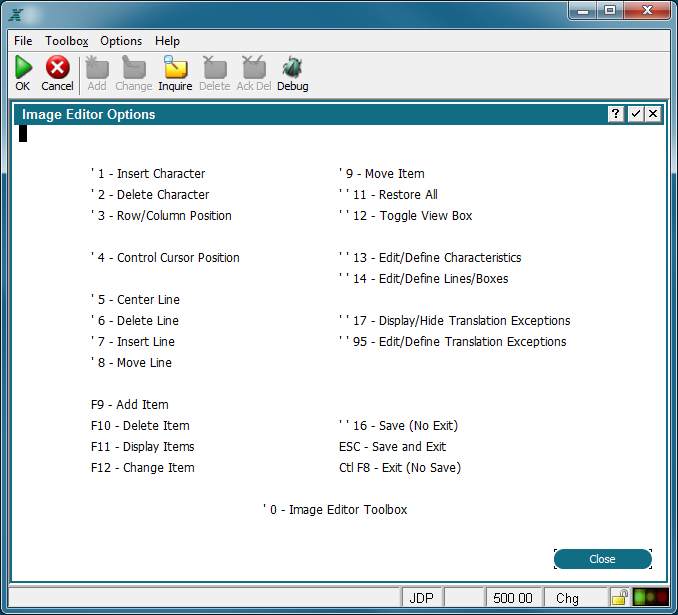
 .
.
 icon from the toolbar.
 icon from the toolbar.